El Rancho

Fabulous 50's home is rescued by overly opinionated guy with too much free time and a gay man's flare for design. Woo hoo!! Grab a pinata and a stick - sounds like a party!

Sunday, May 28, 2006

Tiki Puka Puka

Yesterday, I took the day off from working on the house and Double E and me took a trip down to Atlanta. We made it down in about 3.5 hours and made a quick stop at Ikea for some cool shelving we plan to use in the bedroom that will serve as an office. After loading up the shelving we needed to break for lunch so we headed over to Little 5 Points and ate at the Vortex ...

Here I am pondering life in the entrance ...

yes, giant skulls rule.


and here i ponder life facing in the opposite direction ...

if you're keeping track at home, i had a veggie burger with jack cheese, BBQ sauce, fries and a Dr. Pepper. It was delish and i highly suggest you stop here for lunch should you ever get stuck in Atlanta. Double E enjoyed a delicous cheeseburger and sweet potato fries ... we were officially bloated.


Anyway, from there we decided we needed to cool off a bit, so we wandered downtown to Trader Vics for some lovely fruit drinks. Except for Trader Sam's in San Francisco, this is my all-time favorite place to grab drinks.

Here i am doing some recon trying to find the oh-so-cool side entrance that nobody ever uses (most go through the lobby of the Hilton) ...

i know it's around here somewhere.


i must be getting close ... please note: when hunting for a bar, it helps to wear the same hat as a prominent dictator. on this day, i chose Castro as my inspiration.


once i located the entrance, i stopped to reflect on what i had found ...

aren't you glad you're spending your freetime reading this?


and then i tried to fit in with some of the locals (i hate looking like a tourist)...

seamless job. i don't think anyone even noticed i was from out-of-town.


once inside, the bartender took a picture of us being all disgustingly in love and what not ... notice the drinks on the table ... i think the one in front of me is the Tiki Puka Puka (hence the title of the blog) ...
the interior of this place is awesome ... nice and dark with no windows, too ... easily the kind of place where you lose track of time in a hurry.


here, Double E demonstrates how to drink a cocktail with an orange blossom floating around inside of it ...

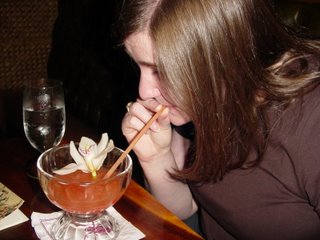
ummmmmmmmmm, delish!


anyway, it was nice to step away from this house for a bit, even if it was just a day, and do nothing (important). today, we put together the shelving units we bought and cleared out the office for wall paper removal, tackboard removal, paint, etc. i will post these pics when we get done tomorrow ... these will be the first interior pics, now that i think about it.

Friday, May 26, 2006

You don't gnome me!

Check it. Today I finished up mulching those beds in front of the house (i finished putting in the edging yesterday and added 11 bags of mulch around 9pm last night - i never quit). Pheeeeeeeeeeew! Not a day too soon either, because it was hot as hell outside (not to mention unbearably humid). Anyway, still not really sure what all i am going to plant out there, but i saw something called a "Purple Shamrock" at Home Depot which i guess is an indoor plant but they are outdoor perennials in this zone. very cool looking. so, i spread out all the mulch and have one lone item planted in there so far.

behold ...
left side (from sidewalk view).


left side (from the neighbor's yard).


right side (big bed) from the sidewalk ... but what is that little thing all the way on the end?


BAM! garden gnome! Double E has a collection of these things and i secretly think they're funny as hell ... i may hide a few more in there once everything is planted.

i forgot to mention this, but i cut out both of the trees that were on either corner of the house before i put down weed matting and mulched these beds. this gnome (we will call him Gus) is actually affixed to three nails running into the core of the trunk of the tree that was on the right side. why? 1) stability 2) if i were in my early teen formative years and i had seen someone with a lone garden gnome in a fresh mulch bed ... well ... let's just say it would have been the equivalent of that homeowner begging me to run up and punt the silly little thing across their yard. anyway, i m hoping that if that happens the nails will help to severly injure any would-be vandals.


oh, and i used a circular saw to cut them out (not recommended) and then pushed and kicked them out after i made the initial cuts. i couldn't justify buying a chainsaw since this will probably be the only time i would have ever needed one while living at this address.also, today, i painted the edges of the sidewalk ... although conventional wisdom would say paint the sides when you painted the top and before you added mulch, i wasn't sold on the color so i held off on the "trim work". i am happy to report that the color of the sidewalk blends perfectly with the mulch beds.

Wednesday, May 24, 2006

Quick update.

it's late and i am sick of computers at this point in the day, so briefly:

i layed down a hose to get an approximation for the shape of the mulch beds in front of the house. these will marry up to the beds along the sidewalk and they will be serpentine (i.e. curvy). After i got an idea of what i wanted (also referencing a book i got from the library on the subject), I spray painted the lines onto the ground. I followed along those with an edger, then went back and skimmed off the top layer of grass with a flathead shovel.

Looks like this ...

obviously, adding edging will really sharpen up the edges ... and the flat looking spot between the two outward curves will actually run into the current bed (and be reseeded in front) so that it forms an inward curve (if that makes sense). basically, it is curvy.


I bought several boxes of edging, but only one of them was the correct type, so i staked it in (in the dark) and will take the other boxes back tomorrow and exchange them for the correct ones. Once I get all of the edging installed, i am going to put down the matting to prevent weeds from popping up and then mulch the beds with the lovely and quite aromatic pine mulch used along the sidewalk. not sure when i will plant in the beds ... the new design gave me some different ideas as far as plants and flowers go.

oh, i almost forgot ... i am going to cut out (weather permitting) the trees in the corner of the beds tomorrow, as well. also, the BFI guys came today and took away all of the garbage and the debris in the trash cans, but not the large pieces of wood or the old work bench that i pulled out of the shed. i stopped by the Utility District to ask them about it and they said he probably thought they were building materials. looks like i may have to make a trip to the dump now. that sucks.

Tuesday, May 23, 2006

The only thing worse than digging holes ...

... is digging a bunch of little holes ... which is pretty much all i did today. I decided to spend the day planting Verbena in the beds along the sidewalk ... i was dying to know if this would improve the color of the sidewalk itself so i had to get it done.

Anyway, i picked up 3 trays of Verbena (red), 3 bags of pine mulch (super cheap and smells great ... Double E prefers the shit-like smell of cypress mulch, but i prefer a nice piney aroma ... my neighbor even came over and commented on how good it smelled ... anyway, if i were gonna pay $4.00 for a bag of mulch, i sure as hell wouldn't want it to smell like Nona's turd-infested litter box ... mini rant over), bag of potting soil, bag of soil conditioner, 2 boxes of platic bed edging (20 ft. rolls). i think the grand total for all this stuff (i had to make two trips because i needed the 3rd bag of mulch and some additional stakes for the edging) was something like $35-$40. pretty cheap.

... sidenote: i have kept every receipt I have related to spending for renovations ... when i am finished i will total it all up and post it here.

anyway, I cut holes in the weed matting i laid down the day before as i went along adding a little conditioner and top soil (mixing them in the hole) then pushing in the Verbena. when finished, it looked like this ...
sun was right in my eyes when i stood back on the sidewalk - made it difficult to get a good photo.


once i had everything planted, i staked in the bed edging and spread the mulch in by hand. finished, it looked like this ...
there are some crinkles in spots on the edging which kind of irritates me ... i will probably overmulch in those spots to camoflouge the flaws. also, the line on the right kind of meanders a bit as it gets to the top ... tree roots made me alter the planting scheme, but it shouldn't matter once they all fill in ... i think they grow to 10" x 10" or something like that ... no-one will ever know but you and i.

this isn't the best photo, but two out of two people told me it looked excellent. speaking of which, i have received an overwhelming amount of positive feedback so far. i sold an old tv to a woman yesterday and she gushed over the interior paint and asked me if i was an artist. ha! i made a ceramic ashtray in 4th grade, so i guess maybe i am an artist ...

Monday, May 22, 2006

Mildly productive day today.

Spoke with the Utility District guys who were checking my water meter this morning (their company is also in charge of trash) to see if all of that debree i pulled out of the shed would be picked up by the BFI truck that follows the sanitation truck on Wednesdays. They seem to believe that they will (they have taken everything else i have put out there) take just about anything as long as it does not contain freon or some readily obvious toxin.

You may recall, this is what the outside of the shed looked like when i was done cleaning the inside ...


after assembling the wheel barrow i purchased a few months ago to assist in the process, it looked like this ...

voila!


unfortunately, the alleyway next to the garage now looks like this ...
Let's hope they take it and save me from a trip to the dump. You can see some clutter in the garage ... those are painting supplies ... i can't wait until i am done with all the painting so i can clear out the middle section of the garage ... also, that is the rear end of my impala sticking out ... i haven't been driving it much at all lately ... but when i do drive it i try to make up for lost time by haulin' total ass.


once i was done with the clean up and had consumed several bottles of water (for rehydration purposes), i moved out to the front yard to put down some mulch bed liner along both sides of the sidewalk ...

i held it down to the ground using a jar full of some rusty 2 inch nails i found in the shed (that's thrifty!) ... i rolled it out on the right side "nailing" it down on both sides of the area that had been cleared for the yard then i cut along the outside edge with scissors ... this worked out well, because the roll was twice the width of the beds so i used the other half of the matting on the left side ... just had to nail it in.

Also note, the yard was mowed today ... it was getting a little bit thick.


i'm probably going to write out an interior and exterior (i know, you haven't seen the interior yet ... it is only about 40% done) "to do" list. i'll post it up later tonight if i get a chance (assuming i actually do it).

It's creepy and it's kooky ... Friday, April 18th

I have been going at it non-stop for a while now and I am starting to get a little burnt out. I decided I was going to take it easy on Friday and since Double E and I had some plans for the weekend, thought it might be a good time to take a break in general. But by early Friday evening I was getting bored and Double E was working late so I decided I would clean out the shed. I wanted to do this for two reasons: 1) by summer, working on this thing in the heat will be unbearable and 2) there are hornet and/or wasp nests everywhere inside this thing and i would really like to clear them out and get it sealed off prior to their return (thus making it unuseable).

The shed, as mentioned previously is split into two halves. The left side, which is on a concrete slab and seems to be some kind of crude workshop with some termite damage (confined to only the left side of the shed - not in the house, garage, etc. ) The right side has a paver base floor and looks to be storage for tools, mowers , etc. (and is serving just that purpose for me).

I knew as soon as i saw it that the left side would need to be cleared out and turned into a bar. My initial thought was tiki bar ... i have been pricing bamboo matting and thatch rolls lately to get a feel for materials costs ... and my second thought was to turn it into a fancy little cottage (still a bar, just with a cottage exterior - English style). I am still leaning towards a tiki bar, however. it's more festive and probably a little more my "style".

Anyway ... this is an 8 ft. by 8 ft. space ... and you would not believe the amount of crap that i pulled out of it. see for yourself in the lovely photo mosaic below:


see what i mean?


here's what it looked like inside ...
you can see the old man's makeshift woodshop ... but it was all rotting and that is probably what enticed the termites - see the damage? i will have to replace a number of the supports. i actually hit one of them with a hammer and found an active termite colony, but i didnt have anything to kill them with so i improvised ... i went to the garage and grabbed a rattle can of red Krylon and sprayed them until they were all dead. On sunday, i actually sprayed the whole thing down with termite repellent.


yuck ... there was a bag of concrete underneath that got wet and cured in the shape of the bag itself.


here you can see one side pre-clean up. some more termite damage and some clutter from my demolition. i swept everything up and it looks fairly respectable now. i can't wait until i get a chance to start working on this - i think it is going to look amazing. definetly something to be proud of ...


did i find any hidden treasures you ask? you bet!
this old Shop Craft jig saw in working order. notice the lack of safeguards present on this thing ... pre-OSHA i am guessing. anyway, i bought some blades for it the next day, but they didn't fit (thanks Lowe's dude) so i haven't had a chance to use it yet.


anything else in there of note? yup!
what's this, you ask? oh ... only one of about three stacks of asbestos. replacement panels for the house, i am guessing. don't think i'll be holding onto those. actually, asbestos really isn't that dangerous unless you are cutting/drilling/sanding it ...and it takes a bit of exposure. besides, if it was good enough to kill steve mcqueen, it's good enough to kill me.

So fresh and so clean - Thursday, May 18th

Finished up the deck and railing ...


oh. i forgot ... at the end of the deck you may be able to see a little ground level brick planter ... pretty cool ... i am going to put some vegetable plants in there and see what happens. i've never done any gardening before ... i think it's all sun and water, but we'll see.


later in the day i moved out to the front side of the house to repaint the sidewalk leading to the front door. all of the concrete is gray, which i don't mind, but they didn't mix in the anti-slip agent that most people use with concrete paint and as a result it gets pretty slick when it's wet. i decided to go with light brown to try to maintain a five color exterior scheme ...

i think this turned out just fair ... i am not in love with the color because it is a little lighter than i wanted, but the next brown available may be too dark. i have decided to wait and see what it looks like flanked by flowers before i change it. another option is to go back to grey. also, when i get around to buying a new front door, it will be red, so the contrast would probably also suit this color. we'll see ...

Is that what the sun looks like ... - Wednesday, May 17th

... it had been so long since i had seen it that i completely forgot what it looked like. sunshine means outdoor projects (trying my best to get them all done before the 90 degree temps hit). broke out the deck paint and rollers ... not going to do much with the deck for now other than give it a nice brigth white coat of paint to help rehab it a bit. there are some things i would like to do, including replacing it with a brick patio, but those are projects for next year.

before:


after ...
god ... this took forever and it still really wasn't done. railing obviously needs paint and the edges and area around the fireplace still need a coat or two. see the shadow of the tree ... this is literally sunset ... it took me all day ... pitfalls of being a perfectionist, i guess.

Rain ... Rain all day. Tuesday, May 16th

it looked liked this all day on Tuesday ...

... which meant indoor projects.


i decided to pick up where i left off the night before and painted the kitchen. Ending up looking pretty sharp ...

almond spice is the color ... very sharp. very sharp.


much better than flowery trim paper in my esteemed opinion.


i had a little time before i had to go meet Double E and some of her friends for dinner, so i quickly taped off the dining room below the chair rail and painted it bright white. before:

not a very clean white and some overlap from the chair rail paint.


15 minutes later ...
jumped in the shower to get ready for dinner ...


only to come out and see this ...

damn you NONA!!!! those are little white paw prints all over the hardwoods ... i will get you for this Nona. I will get you for this.

Sunday, May 21, 2006

The first daily post - Monday, May 15th.

Okay, I can't remember what all i did this day - Double E was home sick so i watched after her a bit. Later in the day when she was feeling better, i decided to do some electrical work. The light at the entrance above the front door was literally just a light bulb and months prior i had purchased a light fixture to replace it. Sunday, knowing that i was going to replace the fixture on Monday, I purchased big, bold, new house numbers ... these replaced the old ones that i took down when i painted the trim around the door a few days earlier.

witness for yourself the crapiness of the old "fixture" ...

lovely, eh?


that's a nest on the underside. those things are everywhere (someone didn't do much preventative maintenance against them ... so now i have to) ... also, notice the lack of a ground wire ... not so safe.


the hardware on this light was tiny and i kept dropping it. i would say half the time i spent installing this light was spent looking for screws in the mulch beds ... the other half was spent cussing like a sailor.

then, the finished product ...

at first, i didnt think the light worked because it seemed dark enough to trigger it (it's a motion sensor) and it wasn't lighting up, but i guess it wasn't ... about 10 minutes later it started to work.

the old numbers were to the right of the door and a little on the smallish side. I got huge numbers and put them above the door to be illuminated by the light. i am always looking out for my directionally challenged friends and family ... you may thank me later.


later that night i decided to finish stripping the border paper in the kitchen. actually, it was already off, but some of the residue and glue remained ...

see what i mean ... squirted the walls with a spray bottle filled with soapy water and wiped the excess with a sponge before it dripped on the cabinets. got the remaining goop off with a scraper ... went to bed with dreams of border paper dancing in my head.

Last before and after: the yard and garage.

Yard before:


this is what i wanted you to see ...

I ripped out that ring and raked out the dirt. it was ugly and would have interfered with the flow of the pathway i plan on building ... so it was removed. I plan on seeding it if and when the sun ever shines again. The grass in the back has filled in much nicer than i thought it would, but the front will probably need to be reseeded or soded this fall. there's a tree stump in there, too ... i am sure this is why the previous owner put this bed there ... he couldn't get the stump out. i'll probably just drill holes in it and dump a bunch of that tree stump decomposer stuff in there.


... and lastly, the garage ...

just like the house, i need to finish the trim on the garage. the door doesn't look as good up close as it does in the picture. it probably needs to be sanded, truth be told, then painted ... it's a really old, cheap door and should probably be replaced. also, the trim between the door and the white panels is a light brown color ... my attempt at adding a fifth color to the scheme of the house.


finally, shot of the garage from the alley ...

i would like to get adventurous on the doors, but 1) painting on metal sucks and 2) painting elaborate schemes vertically on metal sucks even more. we'll see.

Before and after on the backside.

Here it was before:


... and along the deck ...


... now, it looks like this ...

The trim piece is missing from the awning - it has been primered and is in the process of being painted red ... it has been kind of hassle due to the flimsyness of this piece. I still need to paint the concrete, the flower box, etc. ... oh, and that black stain above the flower box is from touch-up paint. i will have to go over that again.


... and of the deck area ...


Not the best picture, but you can see how everything looks. The deck still needs to be painted, but you can see that all of the overgrown shrubs are gone and replaced with a fireplace. Also, there are two mud benches painted red and a white conversation bench painted white. I bought these as kits and assembled and painted them all for about $100.


Here's a little better shot of the fireplace area ...


After my Papa cleared out the shrubs and a bit of the dirt, we covered the area in plastic (to prevent weed growth) and then we filled the area with about 12 bags of pea gravel. The fireplace is resting on four pavers (one per leg for balance and levelness) that were step stones from the garage to the deck (i had previously ripped all of these out of the ground in favor of a brick walkway i plan to put in).

Those strips of wood on the railing are off of the deck along the house. I was actually preping the deck for paint (the old color was off-white) when this picture was taken and needed to pull all of the side trims pieces off.